This document explains the three secure ways to get data from ReadyNAS.
Data recovery from a Netgear NAS (Network Attached Storage) device can be a challenging procedure that calls for certain training and equipment. The following broad procedures can be used to try data recovery from a Netgear NAS:
Examine the connections and hardware: Make that the power and network connections to the Netgear NAS device are made correctly. Make sure there are no physical problems or damages and that all of the cords are firmly attached.
To view the web interface, go to Use the Netgear NAS’s web interface to establish a connection. To access the management interface, open a web browser and type in the NAS’s IP address. Enter the required credentials to log in.

Verify the disk’s state: To check the condition of the hard drives, navigate to the storage or disk status sections of the NAS management interface. Verify that every drive is identified and operating as it should. Any drive that is identified as offline or malfunctioning may need to be replaced or repaired.
Use data recovery software: You can try to recover the data using specialized data recovery software if the Netgear NAS device or disks are still operational but you are unable to access the data. These apps can scan disks and make an effort to recover deleted or lost files. BLR NAS Data Recovery Wizard is one well-liked solution for data recovery software.
Seek expert assistance: Consulting a professional data recovery provider is advised if the Netgear NAS device or disks are physically damaged, or if the data recovery software is unable to recover your files. These services can recover data from damaged storage devices because they have the required technology and skills to do so.
Remember that data recovery is not always assured, particularly in situations when hardware malfunctions or significant physical damage occurs. To avoid future data loss, it is therefore always advisable to periodically backup your vital information.
Servers built with NETGEAR ReadyNAS are resourceful, secure, and reliable. It is composed of RAID arrays, which are NAS hard drive groups that are prone to failure. When there is a mistake or malfunction, the NAS systems send out warnings. On the other hand, the NAS system breaks occasionally and the user does not receive the notice. Now relax! The most dependable and secure methods for NETGEAR ReadyNAS Data Recovery tool are shown in this article.
Causes of Lost NAS Data on NETGEAR
The NETGEAR NAS is a powerful network-attached storage device that has been utilized by many customers. But when we find out that the helpful files and documents we had placed there have vanished, it can be extremely frustrating. There are a few typical causes of NETGEAR NAS data loss with regular use:
Unintentional Error
Accidentally erasing NETGEAR ReadyNAS data happens to everyone. When utilizing a NETGEAR ReadyNAS device, this could occur.
NAS Error or NAS Failure
Failure of the NAS device itself is one of the factors that could result in the loss of NETGEAR ReadyNAS data. Viral infections, system malfunctions, NAS system logical failures, and even RAID failures—such as overheating the RAID hard drive and incorrect RAID configuration—are likely to cause data loss. Moreover, voltage fluctuations, overvoltage, and power outages are probably the root causes of NAS failure. As a result, the data on the NAS drive will likewise be lost.
Additional Data Loss Situations
You have a very high chance of losing NAS data when using the NETGEAR ReadyNAS device because to faulty hard drive startup, installation issues, and unintentional deletion of crucial data. Furthermore, if you try to replace the current partition with a new one that has more storage capacity, you can lose the data on the old drive.
Apart from the aforementioned reasons for the data loss on the NETGEAR NAS, there are various ways to resolve it. It’s displayed in the following table.
The NETGEAR Recycle Bin One feature of the Common Internet File System (CIFS) protocol is ReadyNAS. During the 30-day (default) period, users can still retrieve deleted files from the ReadyNAS Recycle Bin.
Deleted files are kept in the Recycle Bin until they are completely removed when the Recycling Bin is enabled and the Share is accessed via the CIFS file-sharing protocol. When a different protocol is used to access the Share, deleted files are immediately eliminated.
Getting deleted files back from the ReadyNAS Recycle Bin:
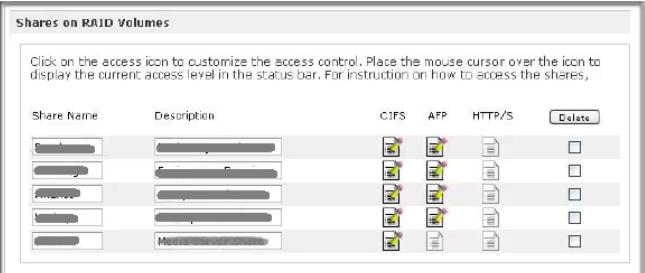
1st step: Verify whether the ReadyNAS Recycle Bin on NETGEAR is turned on. Click the CIFS tab for the share you want by going to Frontview > Shares > Share Listing. Next, scroll down to find out what the options are and whether the Recycle Bin is activated.
2nd Step: If the Recycle Bin is enabled, the deleted files will be located in a folder called “Recycle Bin” at the root of the Share.
3rd Step: After going over and choosing the files you wish to recover, right-click on them to transfer them to a secure location.
If the Recycle Bin is disabled, though, you’ll need to use one of the next three options. Additionally, by doing the actions listed below, you can make the Recycle Bin available for usage in the future:
1st step: Choose Share> Share Listing from the FrontView main menu. Next, the Shares on RAID Volumes screen shows up.
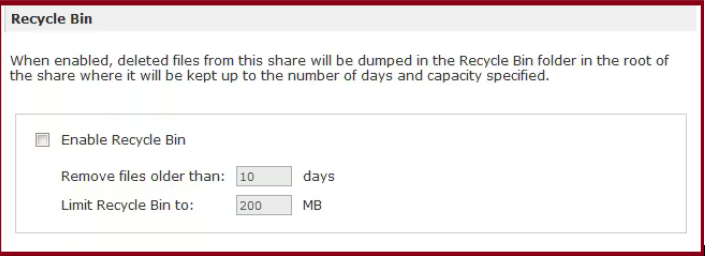
2nd Step: Click Recycle Bin to activate CIFS access rights. Select “Enable Recycle Bin.
3rd Step: Next, enter the maximum duration in days for which the files should be kept (a value entered here will permanently remove any older data). Choose a maximum size (in MB) for the Recycle Bin under “Limit Recycle Bin to.” The oldest files are removed first when the Recycle Bin fills up to this point. Press Apply.
From any of your shared folders, have any files vanished? If snapshots were enabled on these shares, you may use ReadyCLOUD’s Recover functionality to recover a file. By setting up an automatic snapshot plan, you may protect your data against unexpected power outages, malware attacks, and accidental deletion.
To use ReadyCLOUD for NETGEAR ReadyNAS data recovery, follow the instructions below.
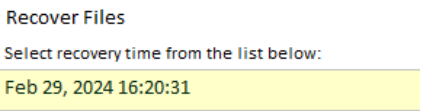
1st Step: Open your account on ReadyCLOUD. Click Recover Files after selecting Documents Share.
2nd Step: Both automatically and manually captured images are listed. Once you’ve chosen the snapshot time you wish to restore, press Next.
Not to worry you can depend on a third-party program like BLR Netgear NAS Recovery Tool if you don’t have any backups. When it comes to resolving NETGEAR ReadyNAS data recovery problems, this software is effective.
The Powerful NAS Recovery Tool is BLR Tools.
You may learn how to use this safe and efficient BLR ReadyNAS data recovery software by following this step-by-step guide.
1st Step: Get BLR Tools NAS Recovery started.
Install BLR Tools nas recovery on your PC after downloading it. After that, open it and select the NAS Recovery option from the NAS and Linux menu.
2nd Step: Link to Your NETGEAR ReadyNAS Device
The NAS device search function of the NETGEAR data recovery program will begin. After the search is complete, choose the NETGEAR ReadyNAS from which you wish to get data.
You must enter the IP address, port, user name, and password for your NETGEAR ReadyNAS in the window that appears. Lastly, to establish a connection between your NETGEAR ReadyNAS device and the BLR NAS Recovery program, select Connect.
3rd Step: Search the ReadyNAS Hard Drive for Lost Data
If the connection is successfully made, the scan will begin automatically. During the scanning process, you can use filters to quickly locate the desired files.
4th Step: Preview and Recovery of Data
You can see the files once the scan is finished to make sure you recover the right ones. Lastly, select Recover to transfer the files back to an external hard drive or the internal drive of your computer.
The majority of the time, a NAS manufacturer that specializes in data storage will provide a free data recovery service for a limited time.
If you have tried some different approaches but are still unable to retrieve the data, it is necessary to get in touch with a NETGEAR data recovery specialist. To accomplish this, please follow the procedures below:
If the TSE is unable to perform the following tasks, the user will be requested to send the ReadyNAS unit together with the hard drives to NETGEAR for diagnostics.
Note: The fee for the first assessment is $250.00 per service, up to one hour. After the first hour, the fee is $200.00 per hour (rounded up for half hours).
NETGEAR gives data recovery services using its tools, technical know-how, and resources as part of its “best effort” policy. There is no promise from NETGEAR that data recovery will always work. The original diagnostic fee is non-refundable, and prices may be different in different areas. You can also use third-party recovery solutions to get your info back.
A NETGEAR ReadyNAS gadget can be very useful and effective. But you might lose data on your NAS for several reasons while using it. If this happens, you can fix it in one of the three ways listed above. We strongly suggest that you use BLR NAS Recovery to recover NETGEAR ReadyNAS data because it is simple to use and can handle all kinds of data loss cases.
File System Support: Most readyNAS data recovery tools can work with a lot of different file systems, such as NTFS, FAT32, HFS+, and ext4. This lets them work with different types of storage and get info back from different file system formats.
Removed File Recovery: One of the main jobs of a ReadyNAS data recovery tool is to get back files that have been removed. When you delete a file from a ReadyNAS device, it doesn’t get removed right away from the disk. The recovery tool can look through the drive and find these lost files, letting you get them back.
Lost Partition Recovery: Partitions on a ReadyNAS device can sometimes get lost or locked out because of disk problems or formatting by accident. You can get back these lost partitions and the data that was saved on them with the help of a ReadyNAS data recovery tool.
RAID Data Recovery: ReadyNAS devices often use RAID (Redundant Array of Independent Disks) setups to make sure that data is safe and that the device runs quickly. A good ReadyNAS data recovery tool can work with various RAID levels, like RAID 0, RAID 1, RAID 5, and more. It can also rebuild the RAID stack to get back data from multiple drives.
Disk Imaging: Many ReadyNAS recovery tools use disk imaging to make sure that data is safely recovered and that no more data is lost. Disk imaging makes a copy of the original drive bit by bit, so the repair process can be done on the copy instead of the original.
Preview and Selective Recovery: Some ReadyNAS data recovery tools may have a preview mode that lets you see which files can be recovered before you start the recovery process. You can save time and space by choosing which files or folders to recover with this tool.
Support for External Drives: Some ReadyNAS data recovery tools can get back data from USB drives or network shares, among other external storage devices. This can help if you want to move the recovered info to a different device or place.
Safety and integrity of data: Reliable During the recovery process, ReadyNAS data recovery tools put data safety and security first. They use complex formulas and methods to make sure that the recovered data stays whole and undamaged.
Customer Support and Updates: Most paid ReadyNAS data recovery tools come with email, phone, or live chat support for customer service. Software updates are also made regularly to fix any problems and make the software work better with other programs.
Remember that the success of data recovery depends on several things, such as how bad the damage is, why the data was lost, and the tool that is used. If you lose a lot of data or aren’t sure how to get it back, you should get help from a professional data recovery service.
A BLR ReadyNAS data recovery tool is a piece of software or an app that can get back lost or deleted data from a Netgear ReadyNAS device.
When you use a ReadyNAS data recovery tool, it looks through the storage drives of your ReadyNAS device to try to find lost or removed files. It can look at the file system, look for file fingerprints, and rebuild data structures to get back data that was lost.
There are many kinds of data that a ReadyNAS data recovery tool can get back, such as papers, photos, videos, audio files, databases, and more.
Yes, a ReadyNAS data recovery tool can sometimes get data back from drives that have failed or been damaged. But how well the data recovery works depends on how bad the damage is and how good the drives are.
Some technical knowledge can be helpful, but many ReadyNAS data recovery tools are made to be easy to use and come with step-by-step steps to help people get their data back.
When you use a data recovery tool, there is a small chance that you will lose data or damage the files even more. It is suggested that you make a copy of the damaged drives before you try to restore them.
A ReadyNAS data recovery tool might be able to get back data from a drive that has been deleted. But the chances of recovery may be different depending on how the data was formatted and then overwritten.
Yes, you can get some free ReadyNAS data recovery tools. The free tools may not have as many features and options as the paid versions, though.
Yes, a ReadyNAS data recovery tool can often work with RAID setups and get back data from RAID systems. But the exact steps and level of compatibility may be different based on the tool and RAID configuration.
If a ReadyNAS data recovery tool doesn’t help you get your data back, you should get help from a data recovery service. Professionals who recover lost data have more up-to-date tools and methods to handle more complicated data loss situations.